In this topic we will describes the necessary steps to migrate a VMWare VM to the Amazon Web Services (AWS) using PowerShell. You could also migrate VM using AWS command line tools, but I found using PowerShell is much easier than command line tools.
Requirements:
- AWS Tools for Windows PowerShell
http://aws.amazon.com/powershell/ - IAM account to authenticate.
- Basic knowledge on PowerShell.
Preparing VMware Guest:
There are few things need to be fix before you start migrating VM to AWS.
- Remove all snapshots from snapshot manager.
- Partition must be IDE All the partition must be IDE, if anyone of them is SCSI, you have to convert it to IDE.
- Primary system drive of the VM must be C: drive, if not you have to change it.
http://support.microsoft.com/kb/223188 - Uninstall VMware Tools.
- You must enable Remote Desktop and also make sure it is not getting blocked by firewall.
- Reset local administrator password. It is always recommended to create one additional local admin user account.
Export VM to OVF:
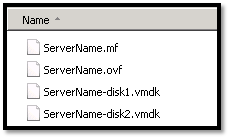
You have to export the VM as OVF template from VCenter with format as Folder of files (OVF). This export the Virtual Disk to VMDK format, which will be imported to AWS. During this export activity you to note down the size of the Virtual Disk. If the VM having two Virtual Disk attached, this will export as follows (disk1 > Primary Boot Dis, disk2 > Additional Disk). Here disk1 is 37 GB and disk2 is 121 GB.
Import to VMDKs to AWS:
Before start importing we have to configure the AWS Access Key and Security Key using following cmdlet.
Set-AWSCredentials -AccessKey "YOUR ACCESS KEY" -SecretKey "YOUR SECRET KEY"
Set-DefaultAWSRegion "YOUR REGION"
To import instance you have to use Import-EC2Instance cmdlet. You have specify Instance type, Volume Size, S3 Bucket Name, Subnet ID, Instance Architecture, Instance platform and Availability zone.
NOTE: **Volume size must be same or greater than the actual volume. Also do not specify an x64 Instance Type if your Operating System is 32-bit. Ensure you select an x86/x64 Instance Type.
Import-EC2Instance `
-ImageFile .ServerName-disk1.vmdk `
-InstanceType m1.medium `
-VolumeSize 37 `
-FileFormat VMDK `
-BucketName S3_Bucket_Name `
-SubnetId SubnetID `
-Group SecurityGroupID `
-Architecture x86_64 `
-Platform Windows `
-AvailabilityZone Zone `
-RollbackOnUploadError
Once you execute above cmdlet, it will start uploading VMDK file to S3 Bucket.

After finishing upload, AWS will start converting the primary volume to instance. You will get ConversionTaskId, with which you will be able to check the conversion progress.
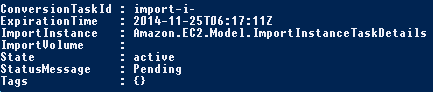
To check the progress, you have to use following cmdlet.
(Get-EC2ConversionTask | ? {$_.ConversionTaskId -eq 'import-i-xxxxxxx'})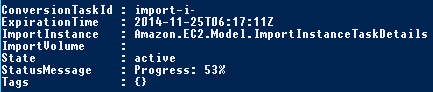
Once conversion complete, you will have to get the instance id using following cmdlet.
(Get-EC2ConversionTask | ? {$_.ConversionTaskId -eq 'import-i-xxxxxxx'}).ImportInstance.InstanceIdNow you have to import and convert additional volumes using Import-EC2Volume cmdlet. You will have specify Volume Size**, S3 Bucket Name & Availability zone.
Import-EC2Volume `
-ImageFile .ServerName-disk2.vmdk `
-FileFormat VMDK `
-BucketName S3_Bucket_Name `
-VolumeSize 121 `
-AvailabilityZone Zone
Once you execute above cmdlet, it will again start uploading second VMDK file to S3 Bucket.

After finishing upload, AWS will start converting the second volume to AWS Volume. You will get ConversionTaskId, with which you will be able to check the progress.
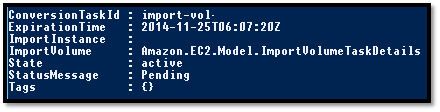
To check the progress, you have to use following cmdlet.
(Get-EC2ConversionTask | ? {$_.ConversionTaskId -eq 'import-vol-xxxxxxx'})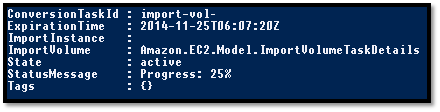
After conversion complete, you will have to get the volume id using following cmdlet and have to attach that volume to previously converted instance.
(Get-EC2ConversionTask | ? {$_.ConversionTaskId -eq 'import-vol- xxxxxxx'}).ImportVolume.VolumeAttaching Volume:
Once you get the volume ID for additional converted volume(s), you have to attach it to the instance using following cmdlet.
Add-EC2Volume "Instance_ID" "Volume_ID" "VolumeDevice"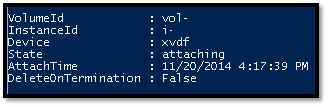
All Done, now you can power on the system on AWS from AWS Console.

AWS EBS Snapshots Automation (Disaster Recovery) from Windows PowerShell
It is always a good idea to reduce hardware dependencies by moving…

From The Blinking Cursor to The Thinking Machine: A Memoir of Automation
There is a specific kind of silence that only exists in a…

S3 Bucket Audit Report using AWS PowerShell Script – Secure your S3 Buckets
If you are working on AWS environment and if you follow…

Do not trust any public VPN service, Create your own Secure SOCKS5 Proxy for just $5 – Be Free 🙂
If someone ask me to recommend one good proxy service, I would…
Hi,
I have tried using your script, but it is showing the below error.
please advise
Thanks.
Vignesh
Sorry forgot the error message
Import-EC2Instance : The import operation failed sending the conversion request to EC2.
The import manifest and image file parts still exist in the S3 bucket.
To retry: Check the instance type and launch specification parameters and re-execute the cmdlet with parameter changes,
remove any -ImageFile parameter and value, add the -ManifestFileKey parameter with value ‘xxxxxxxxxxxxxxxxxxxxxxxxxxxx/xxxxxxxxxxxxxxxxxxxxxx-disk1.vmdkmanifest.xml’.
Thanks,
Vignesh
Have you mentioned the correct instance type?